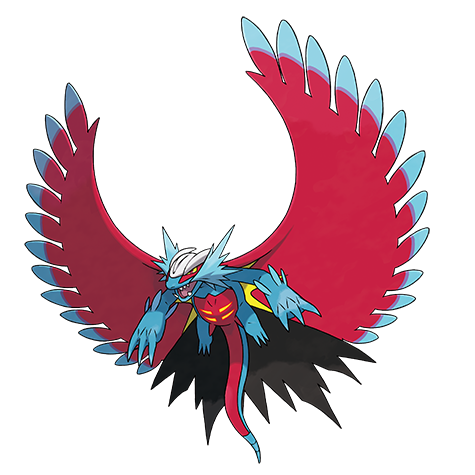

Is Roaring Moon Good in Scarlet & Violet Playthrough?
Dragon/Dark Roaring Moon is a Scarlet-exclusive Paradox Pokemon from Area Zero. Protosynthesis in sun. Massive Attack and Speed. Dragon Dance boosts both further. One of the strongest Paradox Pokemon in Scarlet and a dominant endgame pick.
Roaring Moon resists most of Katy's coverage and hits back hard.
Roaring Moon resists most of Brassius's coverage and hits back hard.
Roaring Moon resists most of Iono's coverage and hits back hard.
Roaring Moon resists most of Kofu's coverage and hits back hard.
Roaring Moon has the type edge here and should clean up Larry's team.
Roaring Moon resists most of Ryme's coverage and hits back hard.
Roaring Moon has the type edge here and should clean up Tulip's team.
Roaring Moon has the type edge here and should clean up Grusha's team.
Roaring Moon has the type edge here and should clean up Rika's team.
Roaring Moon trades roughly evenly with Poppy's team.
Roaring Moon has the type edge here and should clean up Larry's team.
Roaring Moon has the type edge here and should clean up Hassel's team.
Roaring Moon has the type edge here and should clean up Geeta's team.
Catch Roaring Moon on The Great Crater of Paldea (overworld, Lv 52-60).
Scarlet & Violet Roaring Moon Locations
Roaring Moon tops out at low spawn rates across 3 locations in endgame routes. The encounters below are sorted by rate so you can see exactly what you're working with.
Best Locations to Catch Roaring Moon in Scarlet & Violet
Catching Roaring Moon takes patience. The 3 walking encounters at Lv. 52-60 all have low spawn rates, so pick one location and stay put for the best odds.
Roaring Moon Weakness
Fairy, Ice, Fighting, Bug, and Dragon moves hit Roaring Moon for super-effective damage. Fairy hits land at 4x, so they're the biggest threat. The upside? Psychic-type moves can't touch it at all. 6 resistances give it solid defensive coverage on top of that. Roaring Moon's special bulk (base 101 Sp.Def) helps absorb special-type weaknesses, though physical moves exploit the lower Defense.
| Damage | Types |
|---|---|
| 4x (Critical) | Fairy |
| 2x (Weak) | Ice, Fighting, Bug, Dragon |
| 0.5x (Resist) | Fire, Water, Electric, Grass, Ghost, Dark |
| 0x (Immune) | Psychic |
What is Roaring Moon Weak Against
VulnerableBest Pokemon Against Roaring Moon
Wigglytuff NormalFairy | C | |
Available Move Moves
Damage vs Roaring Moon View Wigglytuff builds →Play Rough 4x121-143%KO | ||
Cloyster WaterIce | B | |
Glaceon Ice | B | |
Fidough Fairy | C | |
Vivillon Bug | C | |
Available Move Moves
Damage vs Roaring Moon View Vivillon builds →Struggle Bug 2x33-40% | ||
Florges Fairy | B | |
Wigglytuff NormalFairy | C | |
Available Move Moves
Damage vs Roaring Moon View Wigglytuff builds →Play Rough 4x118-138%KO | ||
Cloyster WaterIce | B | |
Azumarill WaterFairy | C | |
Fidough Fairy | C | |
Available Move Moves
Damage vs Roaring Moon View Fidough builds →Play Rough 4x100-119%KO | ||
Dachsbun Fairy | C | |
Available Move Moves
Damage vs Roaring Moon View Dachsbun builds →Play Rough 4x131-155%KO | ||
Gardevoir PsychicFairy | B | |
Available Move Moves
Damage vs Roaring Moon View Gardevoir builds →Dazzling Gleam 4x127-150%KO | ||
Wigglytuff NormalFairy | C | |
Available Move Moves
Damage vs Roaring Moon View Wigglytuff builds →Play Rough 4x122-145%KO | ||
Azumarill WaterFairy | C | |
Available Move Moves
Damage vs Roaring Moon View Azumarill builds →Play Rough 4x96-113%KO | ||
Cloyster WaterIce | B | |
Gardevoir PsychicFairy | B | |
Available Move Moves
Damage vs Roaring Moon View Gardevoir builds →Dazzling Gleam 4x123-145%KO | ||
Florges Fairy | B | |
Dachsbun Fairy | C | |
Available Move Moves
Damage vs Roaring Moon View Dachsbun builds →Play Rough 4x127-150%KO | ||
Wigglytuff NormalFairy | C | |
Available Moves Moves
Damage vs Roaring Moon View Wigglytuff builds →Play Rough 4x116-136%KO Brick Break 2x32-38% | ||
Azumarill WaterFairy | C | |
Available Moves Moves
Damage vs Roaring Moon View Azumarill builds →Play Rough 4x92-109%KO Brick Break 2x26-30% | ||
Grimmsnarl DarkFairy | B | |
Available Moves Moves
Damage vs Roaring Moon View Grimmsnarl builds →Spirit Break 4x143-169%KO Body Press 2x51-60% Leech Life 2x51-60% | ||
Hatterene PsychicFairy | A | |
Available Move Moves
Damage vs Roaring Moon View Hatterene builds →Dazzling Gleam 4x129-153%KO | ||
Gardevoir PsychicFairy | B | |
Available Moves Moves
Damage vs Roaring Moon View Gardevoir builds →Dazzling Gleam 4x120-141%KO Aura Sphere 2x40-47% | ||
Hariyama Fighting | B | |
Available Move Moves
Damage vs Roaring Moon View Hariyama builds →Focus Punch 2x140-165%KO | ||
Florges Fairy | B | |
Available Moves Moves
Damage vs Roaring Moon View Florges builds →Moonblast 4x129-153%KO Pollen Puff 2x41-48% | ||
Gardevoir PsychicFairy | B | |
Available Move Moves
Damage vs Roaring Moon View Gardevoir builds →Dazzling Gleam 4x125-147%KO | ||
Hatterene PsychicFairy | A | |
Available Move Moves
Damage vs Roaring Moon View Hatterene builds →Dazzling Gleam 4x134-158%KO | ||
Hariyama Fighting | B | |
Available Move Moves
Damage vs Roaring Moon View Hariyama builds →Focus Punch 2x147-173%KO | ||
Florges Fairy | B | |
Dachsbun Fairy | C | |
Available Move Moves
Damage vs Roaring Moon View Dachsbun builds →Play Rough 4x128-151%KO | ||
Grimmsnarl DarkFairy | B | |
Available Moves Moves
Damage vs Roaring Moon View Grimmsnarl builds →Play Rough 4x173-205%KO Body Press 2x52-61% Leech Life 2x52-61% | ||
Hatterene PsychicFairy | A | |
Available Move Moves
Damage vs Roaring Moon View Hatterene builds →Dazzling Gleam 4x132-156%KO | ||
Gardevoir PsychicFairy | B | |
Available Moves Moves
Damage vs Roaring Moon View Gardevoir builds →Dazzling Gleam 4x124-146%KO Aura Sphere 2x41-49% | ||
Hariyama Fighting | B | |
Available Move Moves
Damage vs Roaring Moon View Hariyama builds →Focus Punch 2x144-170%KO | ||
Florges Fairy | B | |
Available Moves Moves
Damage vs Roaring Moon View Florges builds →Moonblast 4x132-156%KO Pollen Puff 2x42-50% | ||
Grimmsnarl DarkFairy | B | |
Available Moves Moves
Damage vs Roaring Moon View Grimmsnarl builds →Play Rough 4x176-207%KO Body Press 2x52-62% Leech Life 2x52-62% | ||
Gardevoir PsychicFairy | B | |
Available Moves Moves
Damage vs Roaring Moon View Gardevoir builds →Moonblast 4x145-171%KO Aura Sphere 2x40-48% Icy Wind 2x29-34% | ||
Breloom GrassFighting | B | |
Available Move Moves
Damage vs Roaring Moon View Breloom builds →Focus Punch 2x156-184%KO | ||
Hatterene PsychicFairy | A | |
Available Move Moves
Damage vs Roaring Moon View Hatterene builds →Dazzling Gleam 4x131-154%KO | ||
Hariyama Fighting | B | |
Available Move Moves
Damage vs Roaring Moon View Hariyama builds →Focus Punch 2x145-171%KO | ||
Grimmsnarl DarkFairy | B | |
Available Moves Moves
Damage vs Roaring Moon View Grimmsnarl builds →Play Rough 4x171-201%KO Hammer Arm 2x63-74% Leech Life 2x51-60% | ||
Gardevoir PsychicFairy | B | |
Available Moves Moves
Damage vs Roaring Moon View Gardevoir builds →Moonblast 4x139-164%KO Aura Sphere 2x39-46% Icy Wind 2x27-32% | ||
Granbull Fairy | C | |
Available Moves Moves
Damage vs Roaring Moon View Granbull builds →Play Rough 4x171-201%KO Outrage 2x75-89% Brick Break 2x47-56% Ice Fang 2x41-48% | ||
Primarina WaterFairy | B | |
Available Moves Moves
Damage vs Roaring Moon View Primarina builds →Moonblast 4x141-166%KO Ice Beam 2x45-53% | ||
Breloom GrassFighting | B | |
Available Move Moves
Damage vs Roaring Moon View Breloom builds →Focus Punch 2x151-178%KO | ||
Grimmsnarl DarkFairy | B | |
Available Moves Moves
Damage vs Roaring Moon View Grimmsnarl builds →Play Rough 4x173-203%KO Hammer Arm 2x64-75% Leech Life 2x51-60% | ||
Gardevoir PsychicFairy | B | |
Available Moves Moves
Damage vs Roaring Moon View Gardevoir builds →Moonblast 4x141-166%KO Aura Sphere 2x40-47% Icy Wind 2x27-32% | ||
Granbull Fairy | C | |
Available Moves Moves
Damage vs Roaring Moon View Granbull builds →Play Rough 4x173-203%KO Outrage 2x76-90% Brick Break 2x48-56% Ice Fang 2x42-49% | ||
Primarina WaterFairy | B | |
Available Moves Moves
Damage vs Roaring Moon View Primarina builds →Moonblast 4x142-168%KO Ice Beam 2x45-53% | ||
Breloom GrassFighting | B | |
Available Move Moves
Damage vs Roaring Moon View Breloom builds →Focus Punch 2x153-180%KO | ||
S | ||
Recommended Build AbilityRegenerator ItemHeavy-Duty Boots NatureImpish Moves View Ho-Oh builds →
| ||
B | ||
Recommended Build AbilityNatural Cure ItemLeftovers NatureCalm Moves View Blissey builds →
| ||
B | ||
Recommended Build AbilityUnaware ItemLeftovers NatureCareful Moves
Damage vs Roaring Moon View Clodsire builds →Earthquake22-26% | ||
C | ||
Recommended Build AbilityDrizzle ItemDamprock NatureRelaxed Moves
Damage vs Roaring Moon View Pelipper builds →Hurricane21-25% U Turn 2x22-26% | ||
C | ||
Recommended Build AbilityIntimidate ItemHeavy-Duty Boots NatureAdamant Moves
Damage vs Roaring Moon View Incineroar builds →Knock Off13-16% Flare Blitz25-29% | ||
Roaring Moon Evolutions
At 590 base stat total, Roaring Moon hits hard for a Dragon/Dark type. No evolution chain and no egg group, just a straight pickup. View every chain in the Evolution Chart.
How to Evolve
Breeding
SV Roaring Moon Best Moveset
Dragon/Dark at 139 Attack and 119 Speed with AbilityProtosynthesis boosting the highest stat. Held ItemBooster Energy with NatureAdamant fires physical Dragon and Dark TermStab at boosted power. MoveDragon Dance stacks Attack and Speed further. The moveset is a setup attacker that starts fast and gets faster. S-Tier through Dragon Dance on an already-fast physical frame.
Best Build
Roaring Moon best EVs are Attack and Speed
Physical Setup Sweeper Moveset
- Dragon Dance
- Dragon Dance
- Earthquake
- Earthquake
Recommended Teammates
Moves List
Need something that threatens multiple types? Roaring Moon's movepool delivers. Coverage across 12 types plus STAB from Draco Meteor and Outrage gives it answers for most defensive cores you'll run into.
How to Read the Moves Table
Tabs
- Level-Up
- Learned by leveling up.
- TM
- Taught by a Technical Machine.
- Egg
- Inherited via breeding.
- Tutor
- NPC tutor (cost: items, BP, money).
- Reminder
- An NPC reteaches any move this Pokemon could have learned by leveling up.
- Transfer
- Carried over from an older game using Pokemon HOME.
- Event
- Given out through Mystery Gift events.
Visual Signals
CAT (Category)
How the move deals damage and which stats it uses.
A small dot on the icon's corner marks the move as contact. That triggers abilities like Static, Flame Body, Rough Skin, or Iron Barbs, plus items like Rocky Helmet and Sticky Barb.
Tier (S to D)
Each move's competitive rank in RankedBoost's system. TM, Egg, and Tutor sort by tier by default (best first). On Level-Up, click the Tier header to do the same.
PWR (Power)
Base damage. Numbers shown in a type color include STAB (base × 1.5). Hover any colored number to see the math.
— means no power (status moves) or variable power.
Sorting & Filter
Click any column header to sort. Level-Up opens with Lv 1 at the top. TM, Egg, and Tutor open with the highest-tier moves at the top.
Search filters by move name or type. The Filter button limits the list to STAB, Physical, Special, or Status moves.
Level-Up Moves
TM Moves
Egg Moves
Tutor Moves
Event Moves
Base Stats
It is possible that this is the creature listed as Roaring Moon in an expedition journal that still holds many mysteries.
According to an article in a dubious magazine, this Pokémon has some connection to a phenomenon that occurs in a certain region.
Roaring Moon Scarlet & Violet Guide
In Scarlet & Violet, Roaring Moon has a 590 base stat total and ranks as B-Tier: a solid option in Scarlet & Violet for the right team. It works best as a sweeper. Dragon Dance with Booster Energy is the standard set.
In Scarlet & Violet, watch for Sylveon (Fairy), Weavile (Ice), and Conkeldurr (Fighting) when using Roaring Moon. They all hit it super-effectively with STAB. Sylveon is the most dangerous since Fairy moves deal 4x damage. Bug and Dragon-type attackers are also a problem. With 5 weakness types, most competitive teams carry at least one counter.
Protosynthesis raises highest stat in harsh sunlight, or if holding Booster Energy. That's the one you want on Roaring Moon. It's the only ability Roaring Moon has.
In Scarlet & Violet, Roaring Moon fills the sweeper role. It's a physical attacker with base 139 Attack. Base 119 Speed lets it outrun most of the field. And it's enough bulk to take a hit or two.
In Scarlet & Violet, run Dragon Dance, Dragon Dance, Earthquake, and Earthquake on Roaring Moon. Dragon Dance is the most common pick at 0% usage. This set covers the sweeper role with a mix of damage and utility.
Game Availability
Introduced in Scarlet & Violet, Roaring Moon has appeared in 1 games across 2 generations. Later debuts mean fewer total appearances, but it's been a consistent presence since its introduction.
Click a game to view version-specific details
- Gen 1RB

 Red & Blue
 - Gen 1Y
 Yellow
 - Gen 2GS

 Gold & Silver
 - Gen 2C
 Crystal
 - Gen 3RS

 Ruby & Sapphire
 - Gen 3E
 Emerald
 - Gen 3FRLG

 FireRed & LeafGreen
 - Gen 4DP

 Diamond & Pearl
 - Gen 4Pt
 Platinum
 - Gen 4HGSS

 HeartGold & SoulSilver
 - Gen 5BW

 Black & White
 - Gen 5B2W2

 Black 2 & White 2
 - Gen 6XY

 X & Y
X & Y - Gen 6ORAS

 Omega Ruby & Alpha Sapphire
 - Gen 7SM

 Sun & Moon
 - Gen 7USUM

 Ultra Sun & Ultra Moon
 - Gen 7LGPE

 Let's Go Pikachu & Eevee
 - Gen 8SwSh

 Sword & Shield
 - Gen 8BDSP

 Brilliant Diamond & Shining Pearl
 - Gen 8PLA
 Legends: Arceus
 - Gen 9SVDebut

 Scarlet & Violet
 - Gen 9LZA
 Legends: Z-A
 - Gen 10WW

 Winds & Waves