
Stats & Training
Sp. Def and Defense carry most of Dewpider's stat budget. Speed's the obvious dump stat. Easy to catch and yields 1 Sp. Def EV. Follows a medium-fast 1M XP curve.
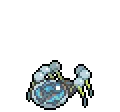
It forms a water bubble at the rear of its body and then covers its head with it. Meeting another Dewpider means comparing water-bubble sizes.
Dewpider normally lives underwater. When it comes onto land in search of food, it takes water with it in the form of a bubble on its head.
Dewpider Weakness
Dewpider's Water/Bug typing leaves it vulnerable to Electric, Flying, and Rock. 5 resistances help offset the weaknesses. Water Absorb grants an additional Water immunity, reshaping the matchup chart.
| Damage | Types |
|---|---|
| 2x (Weak) | Electric, Flying, Rock |
| 0.5x (Resist) | Water, Ice, Fighting, Ground, Steel |
Butterfree Bug | C | |
Wingull Water | D | |
Noibat Dragon | D | |
Available Moves Moves
Damage vs Dewpider View Noibat builds →Wing Attack 2x49-59% Gust 2x33-41% | ||
Drifloon Ghost | D | |
Woobat Psychic | D | |
Available Moves Moves
Damage vs Dewpider View Woobat builds →Air Cutter 2x55-65% Gust 2x39-47% | ||
Butterfree Bug | C | |
Available Moves Moves
Damage vs Dewpider View Butterfree builds →Air Slash 2x90-107%KO Electroweb 2x46-54% Gust 2x51-61% | ||
Wingull Water | D | |
Noibat Dragon | D | |
Available Moves Moves
Damage vs Dewpider View Noibat builds →Wing Attack 2x47-56% Air Cutter 2x47-56% Gust 2x34-41% | ||
Farfetch'd Normal | D | |
Available Moves Moves
Damage vs Dewpider View Farfetch'd builds →Aerial Ace 2x90-107%KO Peck 2x56-66% | ||
Drifloon Ghost | D | |
Noctowl Normal | C | |
Available Moves Moves
Damage vs Dewpider View Noctowl builds →Sky Attack 2x132-157%KO Air Slash 2x86-102%KO Peck 2x38-46% | ||
Butterfree Bug | C | |
Available Moves Moves
Damage vs Dewpider View Butterfree builds →Air Slash 2x89-106%KO Electroweb 2x43-52% Gust 2x51-60% | ||
Wingull Water | D | |
Noibat Dragon | D | |
Available Moves Moves
Damage vs Dewpider View Noibat builds →Wing Attack 2x46-55% Air Cutter 2x46-55% Gust 2x31-37% | ||
Farfetch'd Normal | D | |
Available Moves Moves
Damage vs Dewpider View Farfetch'd builds →Aerial Ace 2x89-106%KO Air Cutter 2x54-65% Peck 2x54-65% | ||
Pelipper Water | B | |
Available Moves Moves
Damage vs Dewpider View Pelipper builds →Fly 2x90-107%KO Air Slash 2x94-111%KO Wing Attack 2x61-71% | ||
Hawlucha Fighting | B | |
Available Moves Moves
Damage vs Dewpider View Hawlucha builds →Fly 2x139-164%KO Bounce 2x133-157%KO Wing Attack 2x94-111%KO Aerial Ace 2x94-111%KO | ||
Cramorant Water | C | |
Available Moves Moves
Damage vs Dewpider View Cramorant builds →Fly 2x130-154%KO Drill Peck 2x118-139%KO Pluck 2x87-104%KO Peck 2x54-64% | ||
Sigilyph Psychic | C | |
Available Moves Moves
Damage vs Dewpider View Sigilyph builds →Fly 2x96-114%KO Air Slash 2x100-118%KO Air Cutter 2x81-96% Gust 2x54-64% | ||
Noibat Dragon | D | |
Available Moves Moves
Damage vs Dewpider View Noibat builds →Fly 2x67-79% Air Slash 2x54-64% Wing Attack 2x45-54% Air Cutter 2x45-54% | ||
Pelipper Water | B | |
Available Moves Moves
Damage vs Dewpider View Pelipper builds →Fly 2x90-106%KO Air Slash 2x95-113%KO Wing Attack 2x60-72% | ||
Hawlucha Fighting | B | |
Available Moves Moves
Damage vs Dewpider View Hawlucha builds →Fly 2x139-164%KO Bounce 2x133-157%KO Wing Attack 2x95-113%KO Aerial Ace 2x95-113%KO | ||
Cramorant Water | C | |
Available Moves Moves
Damage vs Dewpider View Cramorant builds →Fly 2x133-157%KO Drill Peck 2x118-140%KO Pluck 2x90-106%KO Peck 2x55-65% | ||
Sigilyph Psychic | C | |
Available Moves Moves
Damage vs Dewpider View Sigilyph builds →Fly 2x98-116%KO Air Slash 2x10³-123%KO Air Cutter 2x83-99% Gust 2x58-68% | ||
Noibat Dragon | D | |
Available Moves Moves
Damage vs Dewpider View Noibat builds →Fly 2x66-78% Air Slash 2x55-65% Wing Attack 2x45-55% Air Cutter 2x45-55% | ||
Pelipper Water | B | |
Available Moves Moves
Damage vs Dewpider View Pelipper builds →Fly 2x88-103%KO Air Slash 2x93-109%KO Wing Attack 2x60-72% | ||
Hawlucha Fighting | B | |
Available Moves Moves
Damage vs Dewpider View Hawlucha builds →Fly 2x138-163%KO Bounce 2x129-153%KO Wing Attack 2x93-109%KO Aerial Ace 2x93-109%KO | ||
Cramorant Water | C | |
Available Moves Moves
Damage vs Dewpider View Cramorant builds →Fly 2x129-153%KO Drill Peck 2x117-138%KO Air Slash 2x84-100%KO Pluck 2x88-103%KO | ||
Drifblim Ghost | C | |
Available Moves Moves
Damage vs Dewpider View Drifblim builds →Fly 2x124-147%KO Acrobatics 2x76-91% Gust 2x50-59% | ||
Noibat Dragon | D | |
Available Moves Moves
Damage vs Dewpider View Noibat builds →Fly 2x64-75% Air Slash 2x55-66% Wing Attack 2x45-53% Air Cutter 2x45-53% | ||
Pelipper Water | B | |
Available Moves Moves
Damage vs Dewpider View Pelipper builds →Fly 2x88-104%KO Air Slash 2x93-110%KO Wing Attack 2x60-71% | ||
Mantine Water | C | |
Available Moves Moves
Damage vs Dewpider View Mantine builds →Bounce 2x70-83% Air Slash 2x80-95% Rock Slide 2x42-50% Wing Attack 2x50-59% | ||
Cramorant Water | C | |
Available Moves Moves
Damage vs Dewpider View Cramorant builds →Fly 2x129-151%KO Drill Peck 2x116-137%KO Air Slash 2x85-101%KO Pluck 2x88-104%KO | ||
Barbaracle RockWater | C | |
Available Moves Moves
Damage vs Dewpider View Barbaracle builds →Rock Slide 2x129-151%KO Ancient Power 2x50-59% Rock Tomb 2x10³-122%KO Rock Blast 2x45-53% | ||
Noibat Dragon | D | |
Available Moves Moves
Damage vs Dewpider View Noibat builds →Fly 2x65-77% Air Slash 2x55-65% Wing Attack 2x45-53% Air Cutter 2x45-53% | ||
Pelipper Water | B | |
Available Moves Moves
Damage vs Dewpider View Pelipper builds →Fly 2x88-105%KO Air Slash 2x95-113%KO Wing Attack 2x61-72% | ||
Togekiss Fairy | B | |
Available Moves Moves
Damage vs Dewpider View Togekiss builds →Sky Attack 2x138-162%KO Fly 2x88-105%KO Air Slash 2x114-135%KO Ancient Power 2x62-73% | ||
Noivern Dragon | C | |
Available Moves Moves
Damage vs Dewpider View Noivern builds →Fly 2x114-135%KO Air Slash 2x95-113%KO Wing Attack 2x77-91% Air Cutter 2x77-91% | ||
Mantine Water | C | |
Available Moves Moves
Damage vs Dewpider View Mantine builds →Bounce 2x74-88% Air Slash 2x82-96% Rock Slide 2x43-51% Wing Attack 2x53-63% | ||
Cramorant Water | C | |
Available Moves Moves
Damage vs Dewpider View Cramorant builds →Fly 2x133-157%KO Drill Peck 2x119-140%KO Air Slash 2x86-102%KO Pluck 2x88-105%KO | ||
In Sword & Shield, Tyranitar can KO Dewpider with Stone Edge (428-503%). Regieleki threatens a KO with Thunderbolt (149-176%).
Tyranitar RockDark | A | |
Recommended Build AbilitySand Stream ItemChoice Band NatureAdamant Moves
Damage vs Dewpider View Tyranitar builds →Crunch171-201%KO Stone Edge 2x428-503%KO Earthquake71-84% | ||
Regieleki Electric | A | |
Recommended Build AbilityTransistor ItemMagnet NatureTimid Moves
Damage vs Dewpider View Regieleki builds →Volt Switch 2x116-137%KO Electroweb 2x91-108%KO Thunderbolt 2x149-176%KO | ||
Skarmory Steel | B | |
Recommended Build AbilitySturdy ItemRocky Helmet NatureImpish Moves View Skarmory builds →
| ||
Rhyperior GroundRock | B | |
Recommended Build AbilitySolidrock ItemRocky Helmet NatureRelaxed Moves
Damage vs Dewpider View Rhyperior builds →Earthquake56-66% Stone Edge 2x225-265%KO | ||
Sword & Shield Evolution
One evolution ahead. Dewpider grows into Araquanid through a straightforward two-stage chain. A decent partner pool for breeding via two egg groups. Eggs are quick to hatch. The evolved forms gain up to 185 total stats over Dewpider. View every chain in the Evolution Chart.
How to Evolve

Breeding
Breed Dewpider easily with 47 breeding partners from the Bug and Water1 egg groups. Pass egg moves like Power Split, Spit Up, Sticky Web and 1 more to offspring.


Sword & Shield Dewpider Best Moveset
Best Build
No build content available for this Pokemon in Gen 8.
Try selecting a different game/generation filter, or check back later.
Moves
The natural movepool does the job, but Power Split and Spit Up from the egg pool give Dewpider something extra.
Level-Up Moves
TM Moves
Egg Moves
Tutor Moves
Sword & Shield Dewpider Locations
high spawn rates in mid-game routes across 40 locations. Dewpider's one of the easier catches on the list. Knock it out fast and save your time for harder targets.
Best Locations to Catch Dewpider in Sword & Shield
40 spots to find Dewpider at Lv. 16-65 via walking. Not all of them exist in both Shield and Sword versions, so filter by your copy below.
Dewpider Guide
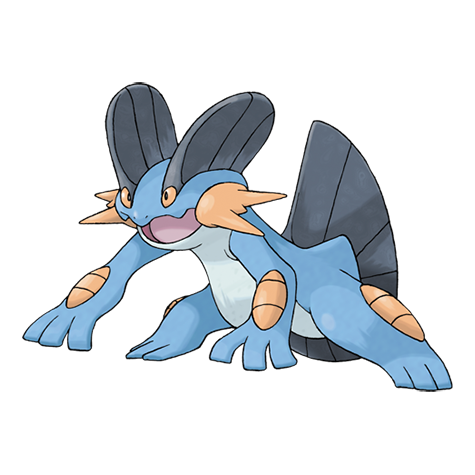
Get Dewpider to Araquanid at level 22. At 269 BST, Dewpider is just the starting point.
Level 22 gets you Araquanid. Not the fastest evolution, so consider Exp. Share or route grinding to speed it up.
For Sword & Shield, you can run Dewpider through the first few routes without issues. 269 BST won't carry you far though. Get it to Araquanid as fast as you can.
You can find Dewpider in Sword & Shield. The Locations section has the full breakdown of routes and encounter details. It also appears in 3 other games across the series.
Game Availability
Dewpider joined the series in Sun & Moon and has been available in 4 titles so far. With 4 generations of appearances, it's established itself despite the later start.
Click a game to view version-specific details
- Gen 1Y
 Yellow
 - Gen 1RB

 Red & Blue
 - Gen 2GS

 Gold & Silver
 - Gen 2C
 Crystal
 - Gen 3RS

 Ruby & Sapphire
 - Gen 3FRLG

 FireRed & LeafGreen
 - Gen 3E
 Emerald
 - Gen 4Pt
 Platinum
 - Gen 4HGSS

 HeartGold & SoulSilver
 - Gen 4DP

 Diamond & Pearl
 - Gen 5BW

 Black & White
 - Gen 5B2W2

 Black 2 & White 2
 - Gen 6XY

 X & Y
X & Y - Gen 6ORAS

 Omega Ruby & Alpha Sapphire
 - Gen 7USUM

 Ultra Sun & Ultra Moon
 - Gen 7SMDebut

 Sun & Moon
 - Gen 7LGPE

 Let's Go Pikachu & Eevee
 - Gen 8SwSh

 Sword & Shield
 - Gen 8PLA
 Legends: Arceus
 - Gen 8BDSP

 Brilliant Diamond & Shining Pearl
 - Gen 9SV

 Scarlet & Violet
 - Gen 9LZA
 Legends: Z-A
 - Gen 10WW

 Winds & Waves