

Is Mamoswine Good in Sword & Shield Playthrough?
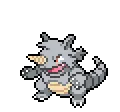
Mamoswine from Ancient Power on Piloswine is one of the best Ice-types in Galar. Ice/Ground with 130 Attack destroys Raihan's Dragon gym and handles Leon's Haxorus. AbilityThick Fat hidden ability halves Fire and Ice damage if you're lucky enough to find one. The standard AbilityOblivious prevents Attract. Either way, Mamoswine hits like a truck.
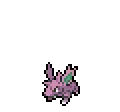
Swinub trades roughly evenly with Milo's team.
Nessa's team hits Swinub's weaknesses hard.
Kabu's team hits Swinub's weaknesses hard.
Bea's team hits Piloswine's weaknesses hard.
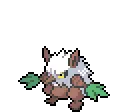
Piloswine trades roughly evenly with Opal's team.
Piloswine has the type edge here and should clean up Gordie's team.
Mamoswine trades roughly evenly with Piers's team.
Mamoswine has the type edge here and should clean up Raihan's team.
Mamoswine has the type edge here and should clean up Bede's team.
Mamoswine trades roughly evenly with Leon's team.
Catch Swinub on Rolling Fields (walking, Lv 7-9). Snowstorm.
Your Swinub should hit Level 33 before you reach Bea, at typical leveling pace.
Usually ready to evolve before you reach Piers, at typical party pace.
How to Get Mamoswine in Sword & Shield
Can't catch Mamoswine directly. Start with Swinub at solid rates from the locations below, then evolve through a special method. The 3-stage chain from Swinub to Mamoswine is where the leveling time goes.
How to Obtain Mamoswine in SwSh
The path to Mamoswine starts with Swinub at Lv. 7-65 via walking encounters. 2 catchable stages total, with locations listed for each one below.
 Step 1Catch SwinubRolling FieldsLv.7-9GrassSwordRate 40%SnowstormRolling FieldsLv.7-10GrassShieldRate 40%SnowstormRolling FieldsLv.7-9GrassSwordRate 35%SnowingRolling FieldsLv.7-10GrassShieldRate 35%SnowingHammerlocke HillsLv.28-30GrassRate 40%SnowingGiant's MirrorLv.26-28GrassRate 30%SnowingGiant's MirrorLv.26-28GrassRate 30%SnowstormGiant's SeatLv.30-35GrassRate 15%SnowingGiant's SeatLv.30-35GrassRate 15%SnowstormDusty BowlLv.42-47OverworldShieldRate 35%SnowstormSlippery SlopeLv.60-65GrassRate 25%SnowstormSlippery SlopeLv.60-65GrassRate 25%SnowingSlippery SlopeLv.60-65GrassRate 20%OvercastSlippery SlopeLv.60-65GrassRate 20%Normal WeatherSlippery SlopeLv.60-65GrassRate 16%Heavy FogSlippery SlopeLv.60-65GrassRate 16%Intense Sun
 Step 2Catch or Evolve PiloswineDusty BowlLv.40-45GrassRate 40%SnowingSlippery SlopeLv.60-65OverworldRate 29%SnowingSlippery SlopeLv.60-65OverworldRate 29%SnowstormLake of OutrageLv.50-52GrassRate 25%SnowingSlippery SlopeLv.60-65OverworldRate 24%Normal WeatherSlippery SlopeLv.60-65OverworldRate 24%Intense SunSlippery SlopeLv.60-65OverworldRate 22%Heavy FogSlippery SlopeLv.60-65OverworldRate 22%OvercastRoaring-Sea CavesLv.60-65OverworldRate 20%All Weatheror evolve from Swinub (Step 1)
 Step 3Mamoswine ✓BREEDINGAvailableLeave a compatible parent at the Pokemon Day Care to receive a Mamoswine egg.
Mamoswine Weakness
Fire, Water, Grass, Fighting, and Steel moves hit Mamoswine for super-effective damage. The upside? Electric-type moves can't touch it at all. Thick Fat reduces Fire/Ice damage, further improving the defensive spread.
| Damage | Types |
|---|---|
| 2x (Weak) | Fire, Water, Grass, Fighting, Steel |
| 0.5x (Resist) | Poison |
| 0x (Immune) | Electric |
What is Mamoswine Weak Against
FragileBest Pokemon Against Mamoswine
Gyarados Water | B | |
Obtain MethodHoneycalm Island Surfing | ||
Hitmonlee Fighting | C | |
Available Moves Moves
Damage vs Mamoswine View Hitmonlee builds →Close Combat 2x10³-121%KO Blaze Kick 2x50-59% | ||
Golisopod BugWater | B | |
Available Moves Moves
Damage vs Mamoswine View Golisopod builds →Razor Shell 2x67-79% Rock Smash 2x25-29% | ||
Arcanine Fire | B | |
Available Moves Moves
Damage vs Mamoswine View Arcanine builds →Flare Blitz 2x96-113%KO Solar Beam 2x74-87% | ||
Sawk Fighting | C | |
Gyarados Water | B | |
Obtain MethodHoneycalm Island Surfing | ||
Hitmonlee Fighting | C | |
Available Moves Moves
Damage vs Mamoswine View Hitmonlee builds →Close Combat 2x10³-122%KO Blaze Kick 2x50-59% | ||
Golisopod BugWater | B | |
Available Moves Moves
Damage vs Mamoswine View Golisopod builds →Razor Shell 2x67-80% Rock Smash 2x24-29% | ||
Arcanine Fire | B | |
Available Moves Moves
Damage vs Mamoswine View Arcanine builds →Flare Blitz 2x96-113%KO Solar Beam 2x73-87% | ||
Sawk Fighting | C | |
Golisopod BugWater | B | |
Available Moves Moves
Damage vs Mamoswine View Golisopod builds →Razor Shell 2x66-78% Brick Break 2x44-52% | ||
Gyarados Water | B | |
Obtain MethodHoneycalm Island Surfing | ||
Darmanitan Fire | B | |
Available Moves Moves
Damage vs Mamoswine View Darmanitan builds →Fire Punch 2x71-84% Hammer Arm 2x64-75% Solar Beam 2x31-37% | ||
Pangoro FightingDark | C | |
Available Moves Moves
Damage vs Mamoswine View Pangoro builds →Brick Break 2x65-76% Bullet Punch 2x24-28% | ||
Passimian Fighting | C | |
Darmanitan Fire | B | |
Available Moves Moves
Damage vs Mamoswine View Darmanitan builds →Flare Blitz 2x115-135%KO Hammer Arm 2x64-76% Solar Beam 2x31-37% | ||
Golisopod BugWater | B | |
Available Moves Moves
Damage vs Mamoswine View Golisopod builds →Liquidation 2x74-88% Brick Break 2x43-51% | ||
Gyarados Water | B | |
Obtain MethodHoneycalm Island Surfing | ||
Hitmonchan Fighting | C | |
Available Moves Moves
Damage vs Mamoswine View Hitmonchan builds →Focus Punch 2x113-134%KO Fire Punch 2x38-45% Bullet Punch 2x21-24% | ||
Pangoro FightingDark | C | |
Available Moves Moves
Damage vs Mamoswine View Pangoro builds →Brick Break 2x65-77% Bullet Punch 2x24-28% | ||
Darmanitan Fire | B | |
Available Moves Moves
Damage vs Mamoswine View Darmanitan builds →Flare Blitz 2x117-138%KO Hammer Arm 2x66-78% Solar Beam 2x31-37% | ||
Golisopod BugWater | B | |
Available Moves Moves
Damage vs Mamoswine View Golisopod builds →Liquidation 2x76-89% Brick Break 2x44-53% | ||
Gyarados Water | B | |
Obtain MethodHoneycalm Island Surfing | ||
Chandelure GhostFire | B | |
Available Moves Moves
Damage vs Mamoswine View Chandelure builds →Overheat 2x163-192%KO Solar Beam 2x101-119%KO | ||
Hitmonchan Fighting | C | |
Available Moves Moves
Damage vs Mamoswine View Hitmonchan builds →Focus Punch 2x115-135%KO Fire Punch 2x39-46% Bullet Punch 2x22-26% | ||
Darmanitan Fire | B | |
Available Moves Moves
Damage vs Mamoswine View Darmanitan builds →Flare Blitz 2x117-138%KO Superpower 2x78-92% Solar Beam 2x31-36% | ||
Chandelure GhostFire | B | |
Available Moves Moves
Damage vs Mamoswine View Chandelure builds →Overheat 2x164-193%KO Solar Beam 2x100-118%KO | ||
Golisopod BugWater | B | |
Available Moves Moves
Damage vs Mamoswine View Golisopod builds →Liquidation 2x76-89% Brick Break 2x44-53% | ||
Passimian Fighting | C | |
Available Move Moves
Damage vs Mamoswine View Passimian builds →Close Combat 2x10³-121%KO | ||
Gurdurr Fighting | C | |
Available Moves Moves
Damage vs Mamoswine View Gurdurr builds →Focus Punch 2x114-134%KO Fire Punch 2x38-45% | ||
Darmanitan Fire | B | |
Available Moves Moves
Damage vs Mamoswine View Darmanitan builds →Flare Blitz 2x117-138%KO Superpower 2x78-92% Solar Beam 2x31-36% | ||
Chandelure GhostFire | B | |
Available Moves Moves
Damage vs Mamoswine View Chandelure builds →Overheat 2x164-193%KO Solar Beam 2x100-118%KO | ||
Golisopod BugWater | B | |
Available Moves Moves
Damage vs Mamoswine View Golisopod builds →Liquidation 2x76-89% Close Combat 2x71-83% | ||
Pangoro FightingDark | C | |
Available Moves Moves
Damage vs Mamoswine View Pangoro builds →Close Combat 2x10⁶-125%KO Fire Punch 2x44-53% Bullet Punch 2x24-28% | ||
Passimian Fighting | C | |
Available Moves Moves
Damage vs Mamoswine View Passimian builds →Close Combat 2x10³-121%KO Energy Ball 2x28-33% | ||
In Sword & Shield, Volcarona's Psychic hits Mamoswine for 46-55%.
A | ||
Recommended Build AbilityBeastboost ItemChoice Scarf NatureJolly Moves
Damage vs Mamoswine View Kartana builds →Knock Off30-36% | ||
Volcarona BugFire | A | |
Recommended Build AbilityFlame Body ItemHeavy-Duty Boots NatureModest Moves
Damage vs Mamoswine View Volcarona builds →Psychic46-55% | ||
Mamoswine Evolutions
Mamoswine evolved from Swinub's chain using knowing a specific move. It's a non-standard trigger, so check the details below. Breed this form to get Swinub eggs (average hatch time). The evolution from Swinub pushed Mamoswine to 530 total stats. Attack saw the largest single gain at +80. View every chain in the Evolution Chart.
How to Evolve
Breeding
Breed with Mamoswine to get Swinub eggs easily using 152 partners from the Ground egg group. Notable egg moves include Ancient Power, Bite, Curse and 4 more.


SwSh Mamoswine Best Moveset
Ice/Ground TermStab at 130 Attack covers Dragon, Flying, Grass, and Ground super-effectively, and AbilityThick Fat halves Fire and Ice damage to patch two of the typing's biggest problems. MoveIce Shard priority bypasses the 80 Speed entirely. A-tier because the moveset's priority and raw power make it extremely hard to play around.
Best Build
Mamoswine best EVs are Attack and Speed
Physical Sweeper Moveset
- Ice Shard
- Earthquake
- Icicle Crash
- Knock Off
Recommended Teammates
Moves List
Don't skip the egg moves. Mamoswine picks up Ancient Power and Bite only through breeding, and both fill gaps the natural movepool can't. STAB runs through Blizzard and Earthquake while Rock and Normal coverage and more adds range.
How to Read the Moves Table
Tabs
- Level-Up
- Learned by leveling up.
- TM
- Taught by a Technical Machine.
- Egg
- Inherited via breeding.
- Tutor
- NPC tutor (cost: items, BP, money).
- Reminder
- An NPC reteaches any move this Pokemon could have learned by leveling up.
- Transfer
- Carried over from an older game using Pokemon HOME.
- Event
- Given out through Mystery Gift events.
Visual Signals
CAT (Category)
How the move deals damage and which stats it uses.
A small dot on the icon's corner marks the move as contact. That triggers abilities like Static, Flame Body, Rough Skin, or Iron Barbs, plus items like Rocky Helmet and Sticky Barb.
Tier (S to D)
Each move's competitive rank in RankedBoost's system. TM, Egg, and Tutor sort by tier by default (best first). On Level-Up, click the Tier header to do the same.
PWR (Power)
Base damage. Numbers shown in a type color include STAB (base × 1.5). Hover any colored number to see the math.
— means no power (status moves) or variable power.
Sorting & Filter
Click any column header to sort. Level-Up opens with Lv 1 at the top. TM, Egg, and Tutor open with the highest-tier moves at the top.
Search filters by move name or type. The Filter button limits the list to STAB, Physical, Special, or Status moves.
Level-Up Moves
TM Moves
Egg Moves
Tutor Moves
Base Stats
This Pokémon can be spotted in wall paintings from as far back as 10,000 years ago. For a while, it was thought to have gone extinct.
It looks strong, and that’s exactly what it is. As the weather grows colder, its ice tusks grow longer, thicker, and more impressive.
Mamoswine Sword & Shield Guide
In Sword & Shield, Mamoswine looks average on paper at 530 BST. But Thick Fat is why it sees play. Build around that and it pulls its weight. B-Tier wallbreaker on our tier list. Ice Shard with Life Orb is the standard set.
Mamoswine gets Thick Fat, Oblivious, and Snow Cloak. But Thick Fat is the one that matters. It's the centerpiece of every viable set. Build around that.
Mamoswine is a physical attacker with base 130 Attack. Enough bulk to take a hit or two, too. Speed tells the real story. Base 80 Speed is workable. Faster than some, slower than many. Fits the wallbreaker role.
In Sword & Shield, run Ice Shard, Earthquake, Iciclecrash, and Knock Off on Mamoswine. Ice Shard is the most common pick at 0% usage. Earthquake provides reliable STAB damage.
Game Availability
Debuting in Diamond & Pearl, Mamoswine appears in 13 games across 7 generations. A reliable presence in a solid number of games, typically found through wild encounters.
Click a game to view version-specific details
- Gen 1RB

 Red & Blue
 - Gen 1Y
 Yellow
 - Gen 2GS

 Gold & Silver
 - Gen 2C
 Crystal
 - Gen 3RS

 Ruby & Sapphire
 - Gen 3E
 Emerald
 - Gen 3FRLG

 FireRed & LeafGreen
 - Gen 4DPDebut

 Diamond & Pearl
 - Gen 4Pt
 Platinum
 - Gen 4HGSS

 HeartGold & SoulSilver
 - Gen 5BW

 Black & White
 - Gen 5B2W2

 Black 2 & White 2
 - Gen 6XY

 X & Y
X & Y - Gen 6ORAS

 Omega Ruby & Alpha Sapphire
 - Gen 7SM

 Sun & Moon
 - Gen 7USUM

 Ultra Sun & Ultra Moon
 - Gen 7LGPE

 Let's Go Pikachu & Eevee
 - Gen 8SwSh

 Sword & Shield
 - Gen 8BDSP

 Brilliant Diamond & Shining Pearl
 - Gen 8PLA
 Legends: Arceus
 - Gen 9SV

 Scarlet & Violet
 - Gen 9LZA
 Legends: Z-A
 - Gen 10WW

 Winds & Waves